
searchit AI Agent
The screenshots show the German user interface.
The searchit AI Agent is an AI assistant that runs on your own computer and works with your searchit search.
Note: Keep in mind that AI agent software runs with your permissions and, when used, transfers data to the AI models you have configured. Both private models and models from public providers such as OpenAI's ChatGPT can be used.
What the AI Agent does
You describe a task to it in everyday language, and it carries out the task with the tools available to it — above all your searchit search. Typical tasks:
- “Find all contracts with company X from last year and summarize what was agreed.”
- “Redact all names in this PDF and save it under a new name.”
- “Find the contact details for this project.”
The agent itself runs on your computer. It sees exactly the documents you are allowed to see in searchit anyway — your permissions apply unchanged. To answer, it uses the language model you have assigned to it.
Requirements
| Click-Service | version 7.0.0.1 or newer, installed and running |
|---|---|
| Operating system | Windows, Linux or macOS from version 13 (Ventura) on Macs with Apple silicon |
| Disk space | around 900 MB, downloaded during setup |
| Access to a language model | model access of your choice — self-hosted or from a public provider |
| searchit instance | at a version that provides the agent's programs — if in doubt, ask your administrator |
ℹ️ The AI Agent is switched off by default. It is not set up when the Click-Service is installed and does not download anything on its own. Nothing happens until you set it up.
Setup
You set up the agent via the searchit icon in the notification area of your taskbar (on macOS in the menu bar).
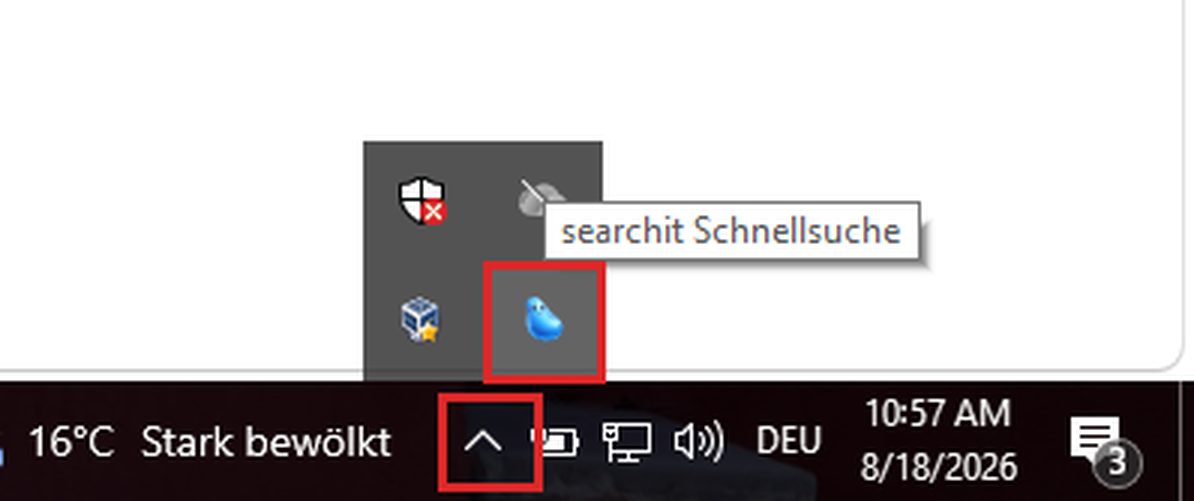
Depending on your settings, the icon is located directly in the taskbar or behind the arrow for hidden icons.
- Right-click the searchit icon → searchit AI Agent → searchit AI Agent installieren… (Install searchit AI Agent…)
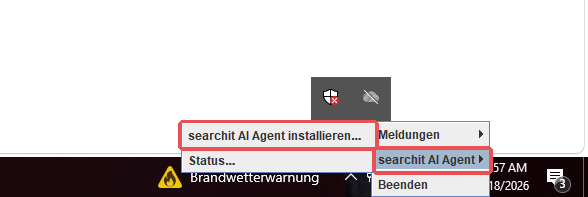
- Confirm the notice that the agent’s programs will now be downloaded (a few hundred MB). Depending on your connection, this takes a few minutes.
- After the download, the setup asks whether the agent should be started right away.
- It then guides you through the remaining steps — first connecting to your searchit instance, then signing in to the language model. For the connection, you enter a name of your choice and the address of your searchit instance.
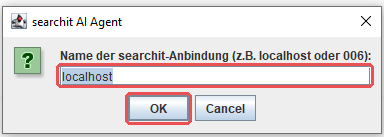
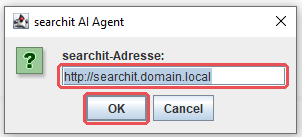
You can skip any of these steps; it is then available as a separate menu item under searchit AI Agent. If you decline the start, the setup ends at that point.
The setup tells you at every step whether it was successful. If something fails, it tells you why.
Access to a language model
For the agent to be able to answer, it needs access to a language model. You decide which one to use — a model operated by your company as well as a service from a public provider.
The quickest way to set it up is with a ChatGPT account: no separate access key is needed. Whether a free account is enough for your tasks depends on its usage limits. The following steps describe this route; you enter other model access in the agent's settings.
ℹ️ A paid ChatGPT subscription usually gives you higher usage limits. If you reach a usage limit, you have to try again later.
- Right-click the icon → searchit AI Agent → Bei ChatGPT anmelden… (Sign in to ChatGPT…)
- A code appears, and your browser opens the OpenAI sign-in page.
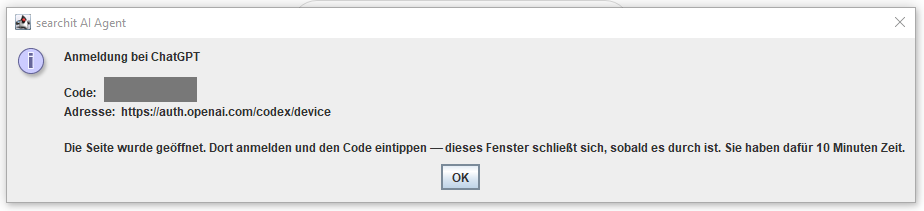
- Enter the code there and confirm the access.
Important: For the code entry to grant access, device code authorization for Codex must be enabled in your ChatGPT account under “Settings – Security”. If your account belongs to a workspace of your company (Business, Enterprise), its administrator enables this permission. - The message in the Click-Service confirms that you have signed in successfully.
ℹ️ If another access to a language model is already stored, it is not replaced. Instead, you receive a notice about it.
Using the agent
After setup, the submenu offers all functions:
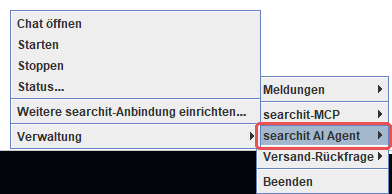
Open chat
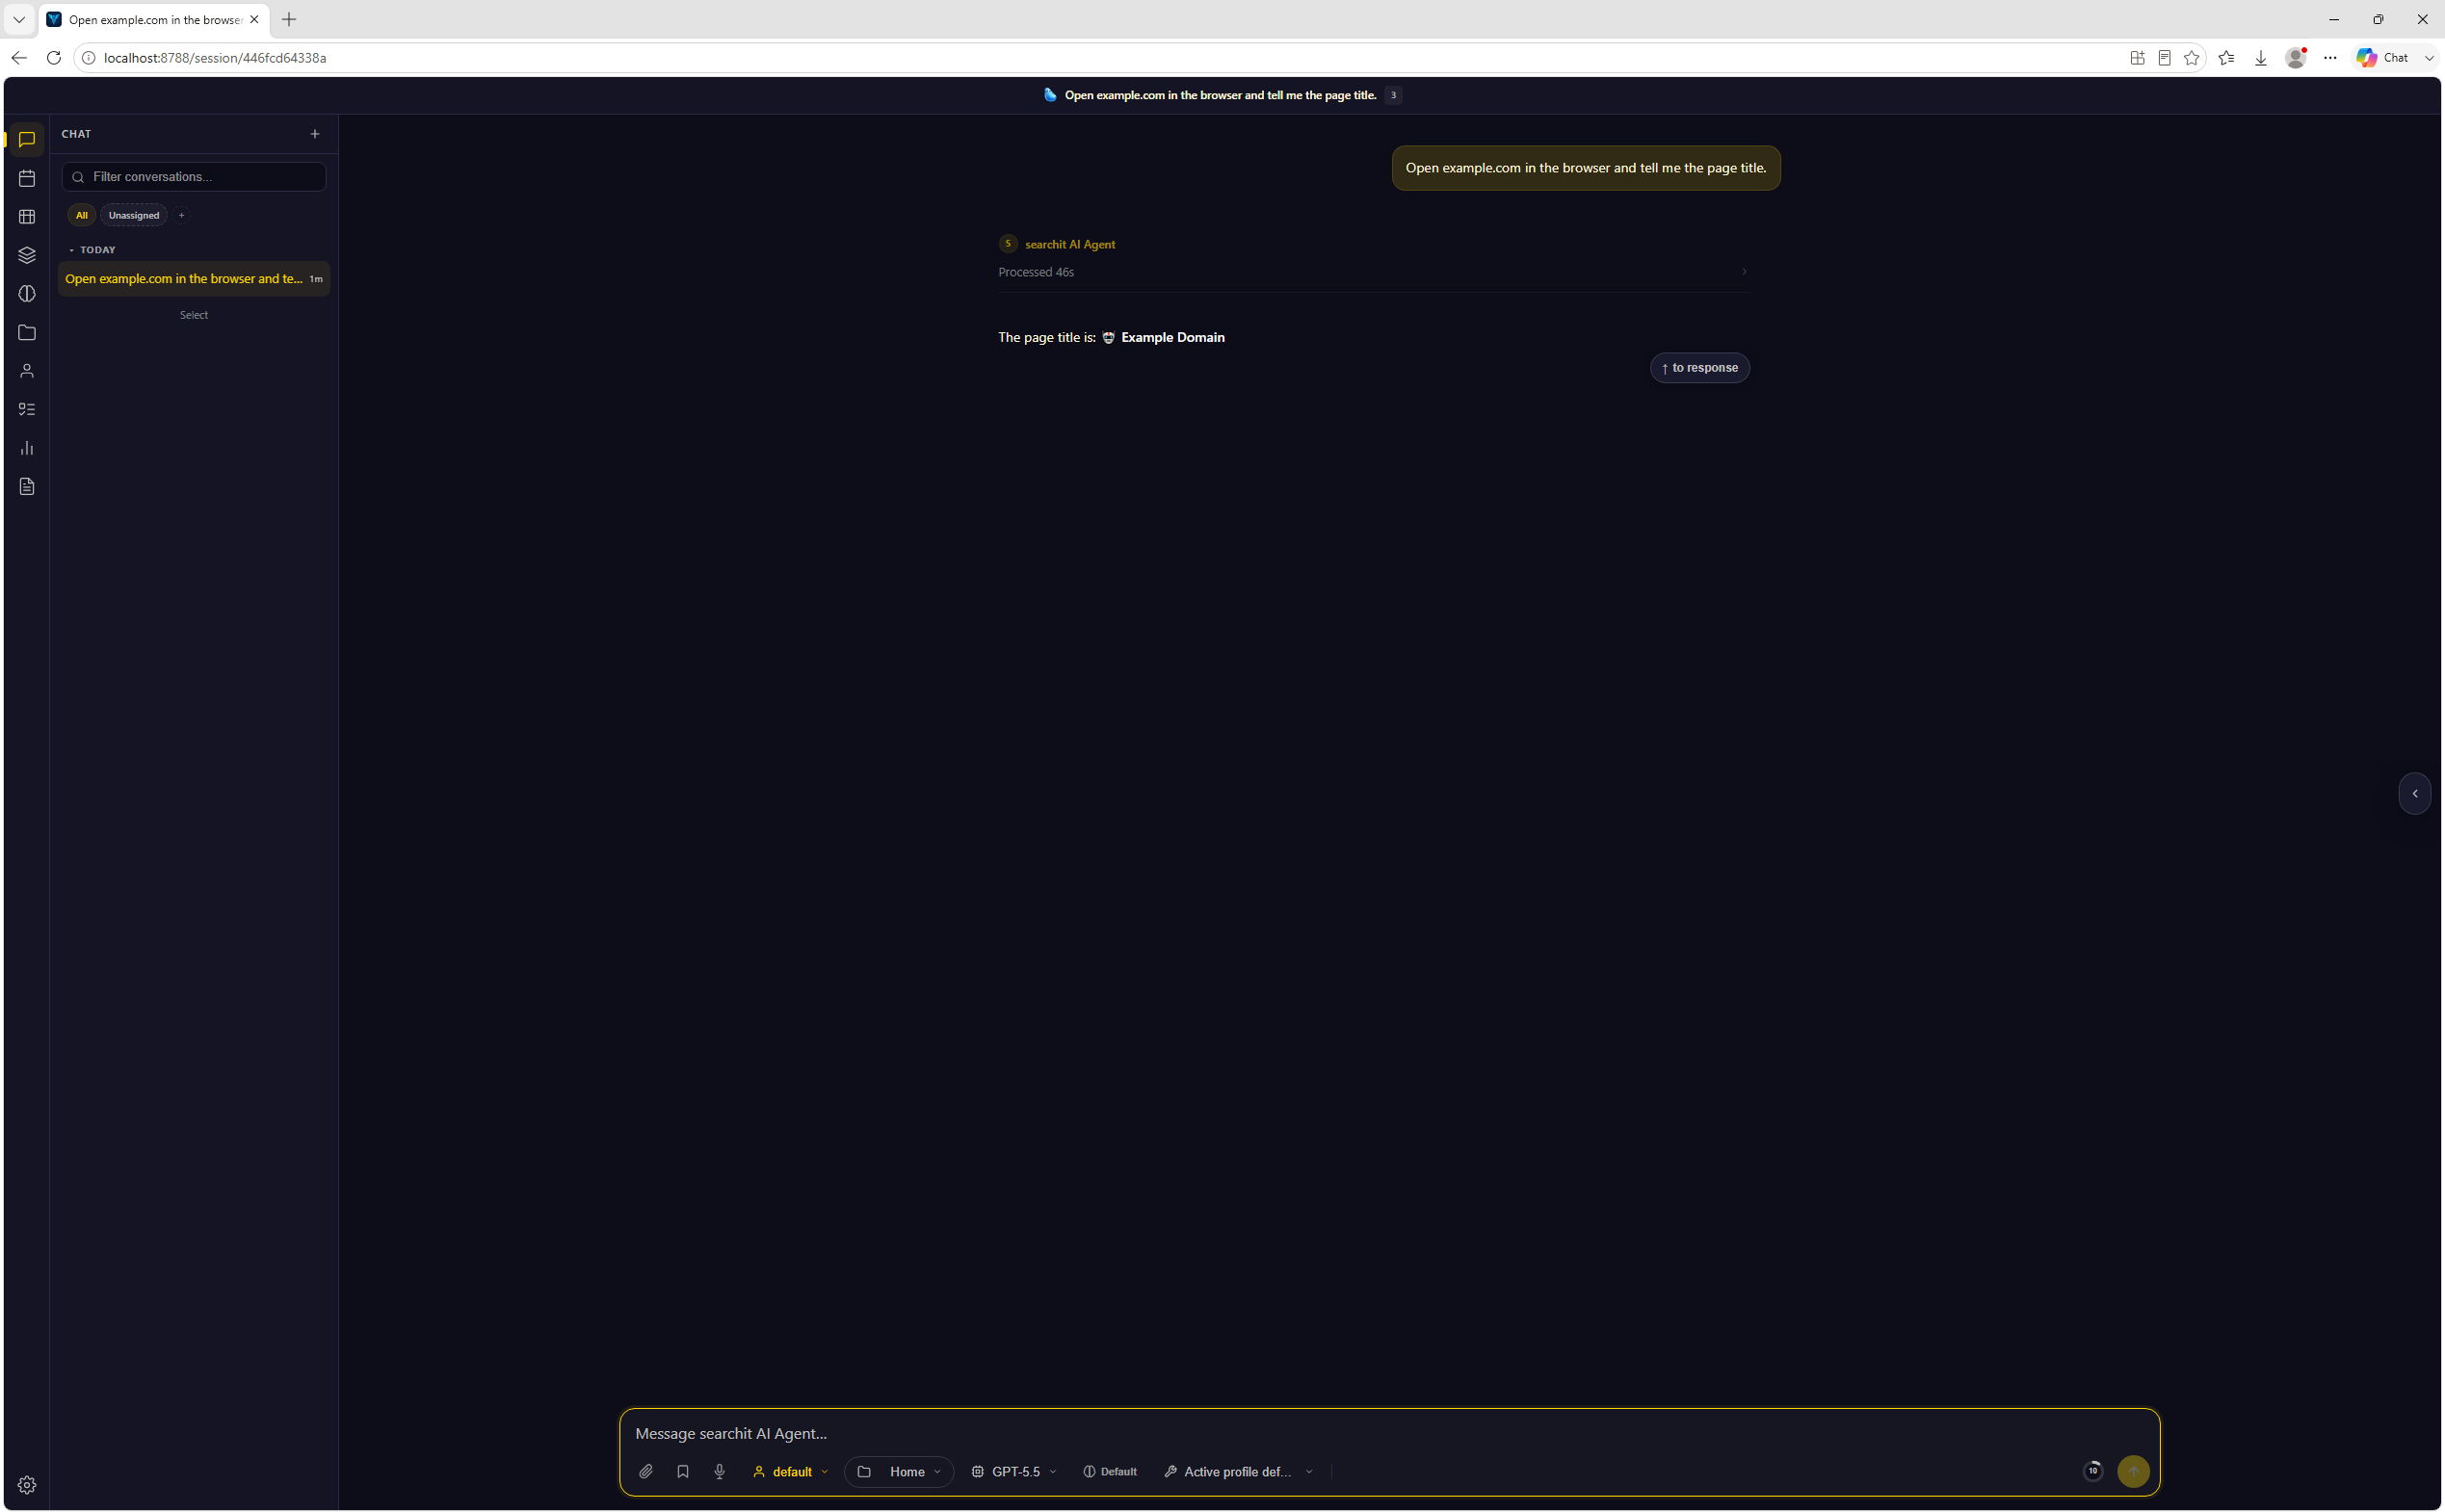
Right-click the searchit icon → searchit AI Agent → Chat öffnen (Open chat). The chat opens in the browser at http://localhost:8788.
You can save the address as a bookmark. It can only be reached from your own computer.
Starting and stopping
You start and stop the agent via the menu. By default, it starts together with the Click-Service; you can change this via Verwaltung (Management) → Mit dem Dienst starten (Start with the service).
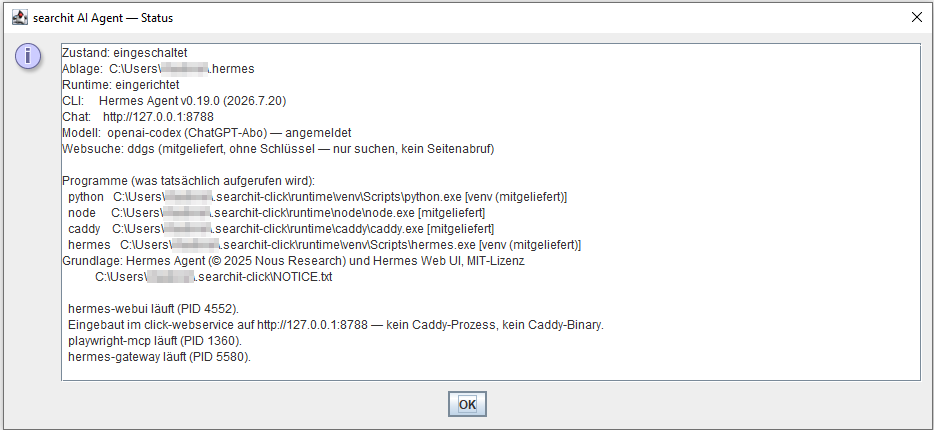
Checking the status
Status… shows you which components are running and whether the connection to searchit and to the language model is working. This view is the first place to look if the chat does not respond.
Send confirmation
Before the agent sends an email or a text message (SMS) on your behalf, or deletes mailbox items (emails, appointments, contacts), it asks for confirmation on screen. When sending, you choose Senden (Send) or Nicht senden (Don't send); Nicht senden is preselected. If nobody answers in time, nothing is carried out.
If you give the agent tasks while you are on the go, for example via Signal or WhatsApp, nobody is sitting in front of the screen and the confirmation goes unanswered. For this case, you switch it off permanently per action: right-click the searchit icon → Versand-Rückfrage (Send confirmation) → E-Mail immer ohne Rückfrage senden (always send emails without confirmation), SMS immer ohne Rückfrage senden (always send SMS without confirmation) or Postfach-Items immer ohne Rückfrage löschen (always delete mailbox items without confirmation).
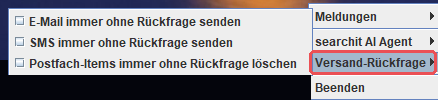
When you switch it on, searchit asks once for confirmation. After that, the permission applies in every session, also after a restart and also when you are not at your computer. A message that has been sent cannot be recalled; deleted mailbox items end up in Deleted Items and can be restored in Outlook. You can withdraw the permission at any time by removing the checkmark again — this takes effect immediately and without confirmation.
ℹ️ If the menu only shows Rückfrage in der Konfiguration abgeschaltet (confirmation switched off in the configuration), your administrator has switched off the confirmation for this computer; the switches are then not shown.
The agent's browser
For tasks that require a web page, the agent uses its own browser. Its window is clearly marked so that you can always see where the agent is currently working.

ℹ️ The agent works in this browser with your permissions — so it can do exactly what you yourself could do there.
Recurring tasks and notifications
The agent can carry out a task on a recurring basis and notify you on its own when it has found something — for example: “Check once a week whether new contracts with company X have been added, and let me know if you find anything.”
You create such tasks in the chat. When the agent reports something, this appears in the notification area:
- The searchit icon gets a red dot and flashes for about a minute.
- Right-clicking the icon shows, at the very top — even above the submenus — the item Meldungen (Notifications) with the number of unread entries in its title.
- Clicking an entry opens the session the notification comes from. This shows you immediately which task has reported and what it has found.
A left-click on the icon stops the flashing without opening anything. The red dot remains as long as there is still something unread.
ℹ️ Depending on the operating system, a short pop-up may also appear at the edge of the screen. Do not rely on it: the list in the menu is the reliable way. It remains until you remove the entries — even across a restart of your computer. The last 50 notifications are kept.
Notification log
Meldungen → Protokoll… (Notifications → Log…) opens the complete list. There, each notification shows the full text with the day of the week, date and time; use ◀ Neuere (Newer) and Ältere ▶ (Older) to page through all stored entries. With In der Sitzung öffnen (Open in session) you can jump to the corresponding chat as often as you like — so an older notification can be opened again at any time.
In the same submenu you will also find Alle als gelesen markieren (Mark all as read) and Alle entfernen… (Remove all…). This only removes the entries in the list; the conversations in the chat remain.
ℹ️ Recurring tasks only run as long as the agent is running. If you expect regular notifications, let it start together with the Click-Service via Mit dem Dienst starten (Start with the service).
Signal and WhatsApp
You can also write to the agent from your phone and have results sent there. To do this, you link your computer as an additional device to your own account — just as you know it from WhatsApp Web or Signal Desktop. A business account or an account with the provider is not required.
Setting up
- Right-click the searchit icon → searchit AI Agent → Verwaltung (Management) → WhatsApp einrichten… (Set up WhatsApp…) or Signal einrichten… (Set up Signal…)
- For WhatsApp, you are asked how you want to use the channel: An mich selbst (To myself; recommended — you write to the agent in your own chat, a second phone is not needed) or Als Bot für andere (As a bot for others).
- A window with a QR code opens. Scan it with your phone: in WhatsApp under Settings ▸ Linked devices ▸ Link a device, in Signal under Settings ▸ Linked devices.
- After scanning, the window reports that linking was successful. The channel goes into operation immediately; you do not need to restart anything.
If you cancel, no half-configured channel is left behind.
ℹ️ Signal is only available on Linux. The reason is a bug in the Signal program used, which prevents incoming messages from arriving on Windows. On other systems, the menu item is therefore not offered at all; the status view states the reason.
ℹ️ For Signal, an additional program of around 115 MB is downloaded once from the network. It is under a different license and is therefore not included. The notice appears before the download, and you can cancel.
Using it
Then simply write to the agent in the linked account — with the setting An mich selbst (To myself) in your own chat. It replies in the same place. It can also send results of recurring tasks there.
If the agent is to send emails or SMS from such a conversation, switch off the send confirmation for this — otherwise it waits for a confirmation on screen that nobody gives.
Relinking and disconnecting
Once a channel is set up, Verwaltung (Management) offers the items … neu verknüpfen… (relink) and … trennen… (disconnect). When disconnecting, you can choose whether the device link on this computer is deleted as well.
⚠️ The entry on your phone under Linked devices remains in any case — remove it there yourself if you no longer want to use the channel at all.
⚠️ WhatsApp disconnects linked devices after about two weeks without a connection. This cannot be seen from the outside. If you no longer get a reply after a longer break, link the channel again via WhatsApp neu verknüpfen… (Relink WhatsApp…).
What the agent can do
Among other things, it comes with skills for:
- Searching in searchit — finding, narrowing down and summarizing results
- Opening documents on your computer
- Redacting PDF files
- Searching for contacts
- Reading email attachments
- Opening web sources, including those that require a sign-in
- Generating images — requires your own account with OpenRouter; the ChatGPT route alone is not sufficient for this
- Notifying you on its own when a recurring task has found something
- Receiving and answering messages via Signal and WhatsApp
What stays on your computer
The agent itself, its settings, your chat histories and the processed files stay on your computer. None of this is transmitted to searchit or to your system administrator.
What the agent does in searchit, on the other hand, runs via your searchit instance: it carries out search queries and send jobs such as email or text message (SMS) there, and the instance logs these calls.
The user interface can only be reached from your own computer. Other people on the network can neither access it nor view your chats.
Removing the agent
Right-click the searchit icon → searchit AI Agent → Verwaltung (Management) → searchit AI Agent deinstallieren… (Uninstall searchit AI Agent…)
This removes the agent's programs. Your chat histories, settings and stored access credentials are kept — they are located in your user profile and are available again after you set it up again.
If you also want to remove this data, select the checkbox auch persönliche Daten … löschen (also delete personal data …) in the last confirmation prompt. This cannot be undone.
If you uninstall the entire Click-Service, your personal data is also kept.
If something does not work
- The chat does not respond — open Status… and check whether access to a language model is stored. If it is missing, add it — for the ChatGPT route via Bei ChatGPT anmelden… (Sign in to ChatGPT…)
- The agent finds nothing in searchit — check in the status whether the connection to your searchit instance exists. If necessary, test it via Verwaltung → searchit-Anbindung prüfen (Management → Check searchit connection).
- The setup fails while downloading — your searchit instance may not yet provide the programs. Contact your administrator.
- The menu item is missing entirely — the Click-Service is older than version 7.0.0.1. Please update it.
- No icon in the notification area — Windows initially hides new icons; you will find it behind the arrow for hidden icons.
- A recurring task never reports — recurring tasks only run while the agent is running. Check in Status… whether it is running, and enable Mit dem Dienst starten (Start with the service).
- No reply via Signal or WhatsApp — check the line for the channel in Status…: it tells you whether it is linked and gives the reason if it was not put into operation at the last start. Then stop and start the agent once. For WhatsApp, after a longer break, also scan again via WhatsApp neu verknüpfen… (Relink WhatsApp…).
- Clicking a notification takes you to the searchit search instead of the chat — your searchit instance is not yet at the matching version. Contact your administrator.
- The conversation from your phone is missing in the chat — by default, the chat interface hides sessions from a messenger. The setup switches them on; if you have changed the setting yourself, enable it there again.
- Nothing is sent from Signal or WhatsApp — the send confirmation is waiting for a confirmation on screen. Switch it off permanently for email or SMS.
Via Verwaltung → Protokoll (Management → Log) you can view the most recent messages — helpful when you contact support.
Not available
- macOS before version 13 and Macs with an Intel processor — the Click-Service runs, but the searchit AI Agent cannot be set up there.
- Terminal servers without a workstation instance — on a terminal server, the searchit AI Agent is only available if the setup was installed with the option Arbeitsplatz-Instanz je Sitzung (workstation instance per session) (see Installation on terminal servers). Each session then gets its own agent with notifications, redaction and WhatsApp. Without this option, only the click actions are available.
- Signal outside Linux — on Windows and macOS, Signal is not offered, not even on the terminal server. WhatsApp is not affected.
Related pages
Read here how to install the Click-Service on your computer.
Last updated on 21 September 2026